"Hello, world" — The Minimal Example
Pre-requirement Knowledge and Skills
It is implied that you are already can/know:
- Create the Node.js project and install the npm dependencies (if no, you should to learn the Node.js fundamentals first).
- Configure the TypeScript compiler (Yamato Daiwa Backend (from now: YDB) is intended to be used with
TypeScript, herewith withoutanytype). - The Object Orienting Programming (OOP) fundamentals: the approaches suggested by @yamato-daiwa/backend is OOP-based). Although YDB not impose the specific architecture, the usage of OOP is desirable, and therefore will be in the following lessons.
Node.js-project Rollout
Create the new Node.js project and install the following npm dependencies. During this lesson it is strongly recommended to install the versions specified inside the square brackets to avoid the troubles caused by changing of the API with new versions of these dependencies.
- @yamato-daiwa/backend [0.4.0]
- The main npm package of this framework
- typescript [5.8.3]
- The npm package package of the TypeScript language.
- tsx [4.20.3]
- The too for the execution of the code written by TypeScript execution tool without outputting of JavaScript files to drive.
npm i @yamato-daiwa/backend@0.4.0npm i typescript@5.8.3 tsx@4.20.3 -D
Code
Bellow primitive application will return the HTML code, consisting of the heading h1 with text content "Hello, world!" on the HTTP request of GET-type to http://127.0.0.1:80/ address. Actually, such HTML code does not represent the valid HTML page, however for testing purposes the responding just with HTML body is possible — modern browsers will display it. Before submit this request, let us analyze the source code of this simplest example.
import {
  Server,
  Request,
  Response,
  ProtocolDependentDefaultPorts,
  HTTP_Methods
} from "@yamato-daiwa/backend";


Server.initializeAndStart({initializeAndStart of Server class accepts the configuration object as first and only parameter. This method does things exactly according to its name, and only that's how it should be. IP_Address: "127.0.0.1",IP_Address has been made to required property not without reason: you as engineer must comprehend on which IP address your server application will run. In the real project, it will be environment-dependent (local, staging, production, etc.). We will discuss the conditional configuration in dedicated tutorials. For now, let the value 127.0.0.1 AKA the localhost. HTTP: { port: ProtocolDependentDefaultPorts.HTTP },ProtocolDependentDefaultPorts.HTTP — is the default port for HTTP protocol. It must be specified explicitly by the same reason as IP_Address, however because rely to human's memory could be dangerous, the default ports of various protocols has been stored to ProtocolDependentDefaultPorts enumeration. From you it is required only to comprehend on default port will be available the application or on some one else. routing: [
{
HTTP_Method: HTTP_Methods.get,
pathTemplate: "/",http://127.0.0.1:80/ URI. It is required to specify via pathTemplate the URI part going after the IP address and port — in our case it is just / (the "root"). By the way, currently we are speaking about the path, but URI could have other parts after the path — we will not go into details about this to avoid of the oversaturating of this lesson. For now, it is important what if we will submit the request to another route, for example /foo (corresponding to URI http://127.0.0.1:80/foo) or /bar/baz (corresponding to URI http://127.0.0.1:80/bar/baz), the server will respond with "not found" error. async handler(request: Request, response: Response): Promise<void> {The request handler defines which actions must be executed when the submitted request satisfying to the specified combination of HTTP method and path. This function is a-priori asynchronous (returns either explicitly or implicitly the instance of Promise, but this is not exact definition from the viewpoint of ECMAScript, because the functions accepts the callbacks via parameters also being called «asynchronous»), because the response submitting is asynchronous by its nature. In addition the request handler frequently includes other asynchronous operations such as database transactions or files reading/writing.
Usually the response is being generated depending on the request, which instance represented by first parameter. For example, in the GET-request case we may need to access to query parameters (without URI context this term could be ambiguous), and in the POST- or PUT-request case — to access the data containing in the request body. However, we will postpone the manipulations with the instance of Response class to subsequent, more difficult lessons; for now let us ignore the first parameter and always submit the same response.
return response.submitWithSuccess({ HTML_Content: "<h1>Hello, world!</h1>" });As generally known, the HTTP response has the status being abbreviated by 3-digits code. Currently it is important that these statuses are being split to 5 groups:
- Informational responses
- Successful responses
- Redirection messages
- Client error responses
- Server error responses
Method submitWithSuccess of the class Response submitting the code from the "successful" range (200 as default). Specifying the HTML_Content property of the first and only parameter of submitWithSuccess method, we are expressing that going to submit the HTML code, and the framework will automatically set the necessary HTTP-headers.
      }
    }
  ]
});
Testing
Let us launch our application by tsx.
tsx EntryPoint.ts
If you got the message about tsx not found, besides the global installation of this utility you can add the script like "start": "tsx EntryPoint.ts" to your package.json and execute it:
npm run start
If the code has no mistakes, you will be informed about application successful launching by the following terminal output:

Open the displaying URI in your browser. If your terminal can recognize the links, you can open it by mouse click. At least one log will be displayed, about request to root route:

Probably one more request will be logged — about /favicon.ico route:
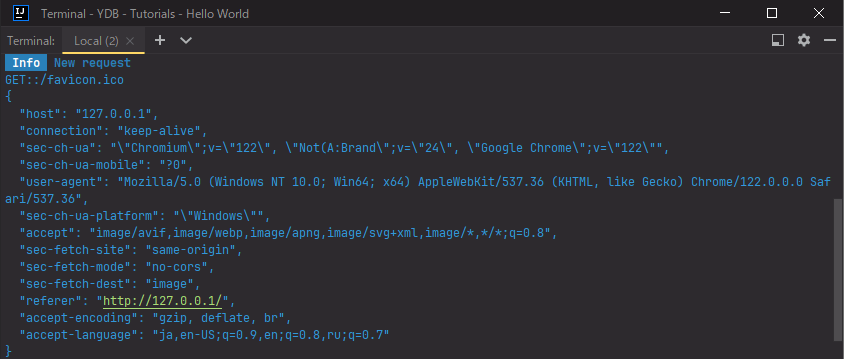
If such log presents, it has been occurred by the browser automatically to display the favicon. If the framework was not prepared to such request, it submitted the response with "not found" error, however the YDB framework submitting the own icon as default. Of course it could be replaced with another one, what we will do in one one of subsequent lessons.
As localhost is the "pronoun" for the IP-address 127.0.0.1, and 80 is the default port for the HTTP protocol, besides http://127.0.0.1:80/ we can submit the requests to http://localhost, http://localhost:80 or http://127.0.0.1:80/.
Finally, let us see how the framework will behave when we will submit the request which has no the matching in routing. For example, in the request to http://127.0.0.1:80/foo case, the log will be:
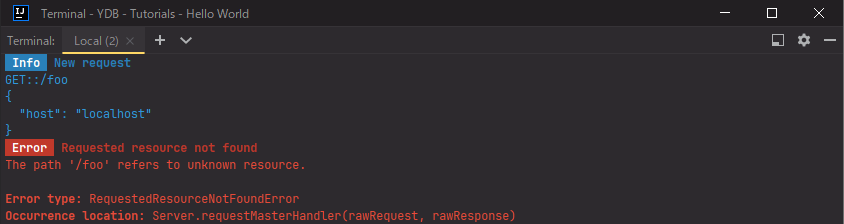
The frameworks logged that the requested resource not found. The browser should display the similar message basing on response status 404 Not found.